
How Brine Shrimp Eggs Hatch: The Complete Artemia Hatching Process
, by David Lo, 8 min reading time
, by David Lo, 8 min reading time
Brine shrimp eggs, known scientifically as Artemia cysts, hatch through a fascinating biological process that transforms a dormant embryo into a free-swimming larva. This process begins when cysts absorb water and reactivate metabolism, eventually leading to the release of Artemia nauplii. In this guide we explain the complete Artemia hatching process, including hydration, shell rupture, embryo emergence, and nauplius release. Understanding these stages helps aquarists and breeders improve hatch rates and produce healthy live food for fish fry and aquaculture species.
Brine shrimp eggs, scientifically known as Artemia cysts, are widely used in aquaculture and aquarium breeding because they can remain dormant for long periods and hatch into nutritious larvae called nauplii.
The hatching process is a complex biological sequence that begins when the dormant cyst is exposed to water and favorable environmental conditions such as oxygen, light, and appropriate temperature.
Understanding how Artemia eggs hatch helps aquarists achieve higher hatch rates and produce healthier live food for fish fry.
Brine shrimp eggs are actually dormant cysts containing an undeveloped embryo. These cysts are produced by adult Artemia when environmental conditions become unfavorable.
Cysts have several remarkable properties:
They can survive years in a dry state
They tolerate extreme salinity
They remain biologically dormant until hydrated
Once placed in saltwater under the right conditions, the embryo resumes development and begins the hatching process.


The first stage of Artemia hatching is hydration.
When cysts are placed in seawater, they begin absorbing water through their shell. This process causes the cyst to swell and activates metabolic processes within the embryo.
During hydration:
metabolic activity increases
enzymes become active
oxygen consumption rises
This stage typically lasts 1–2 hours depending on temperature and salinity.


After hydration, internal pressure builds inside the cyst due to osmotic processes.
The embryo converts stored compounds such as trehalose into glycerol, increasing internal osmotic pressure.
Eventually the cyst shell ruptures. This stage is known as the breaking stage (E-1).
At this point the embryo is no longer inside the shell but is still enclosed within the hatching membrane.
Following shell rupture, the embryo begins emerging from the cyst.
This phase is sometimes called the umbrella stage because the embryo remains partially attached beneath the shell while expanding.
The embryo continues developing appendages and internal organs during this stage.
The hatching membrane still surrounds the embryo and protects it during development.


The final stage occurs when the hatching membrane breaks and the larva is released.
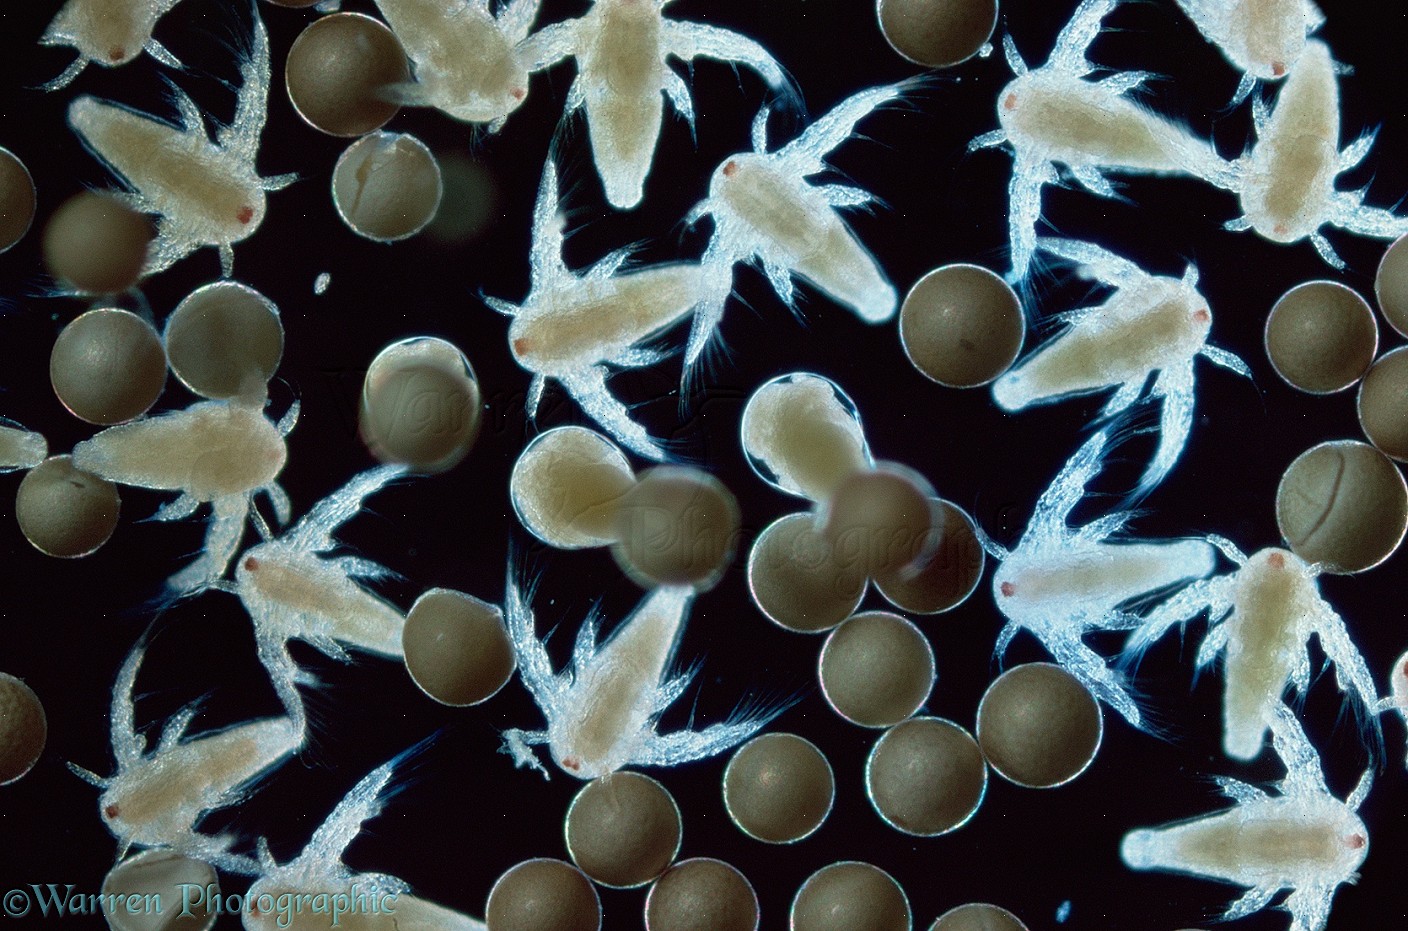
This larval form is called the Instar I nauplius.
Characteristics of newly hatched nauplii include:
body length around 400–500 micrometers
orange coloration from yolk reserves
three pairs of appendages
a single median eye
At this stage the digestive tract is not yet functional, so the nauplius relies entirely on its internal yolk for energy.
Within several hours, the nauplius molts into Instar II, where active feeding begins.
Several environmental conditions strongly affect Artemia hatch success.
Optimal hatching temperatures range between:
25–30°C
Lower temperatures slow development, while excessively high temperatures may damage the embryo.
Artemia cysts can hatch in a wide range of salinities, but the best results typically occur at:
25–35 ppt
The optimal pH range for Artemia hatching is:
8.0–9.0
Light is an important trigger that activates embryonic metabolism.
Low illumination can reduce hatch rates.
Under ideal conditions, Artemia cysts usually hatch within:
18–24 hours
However, several factors influence the exact timing:
cyst quality
incubation temperature
salinity
oxygen availability
Commercial hatcheries often monitor the hatching curve using several timing indicators:
T0 – first appearance of nauplii
T10 – 10% hatch
T90 – 90% hatch
These values help determine the hatching synchrony of a cyst batch.
For aquarists and aquaculture producers, understanding the Artemia hatching process has several practical benefits.
It allows breeders to:
improve hatch rates
produce consistent live food supplies
reduce wasted cysts
optimize feeding schedules for fish larvae
Because Artemia nauplii are rich in nutrients and easy to culture, they remain one of the most widely used starter feeds in aquaculture worldwide.
The Artemia hatching process is a remarkable biological transformation that begins with a dormant cyst and ends with the emergence of a free-swimming nauplius.
Through hydration, shell rupture, embryo emergence, and larval release, the Artemia embryo transitions from cryptobiosis to active life.
Understanding these stages allows aquarists and hatcheries to maximize hatch success and reliably produce one of the most valuable live feeds available for fish fry and aquaculture species.
Clegg, J.S., & Conte, F.P. (1980). Artemia cyst biology and embryonic development.
Persoone, G., Sorgeloos, P., Roels, O., & Jaspers, E. (1980). The Brine Shrimp Artemia: Ecology, Culturing, Use in Aquaculture.
Sorgeloos, P., Lavens, P., Léger, P., Tackaert, W., & Versichele, D. (1986). Manual for the culture and use of brine shrimp Artemia in aquaculture.
Vanhaecke, P., & Sorgeloos, P. (1982). International study on Artemia cyst hatching characteristics.
Clegg, J.S. (2001). Cryptobiosis and the survival mechanisms of Artemia embryos.